About Me

My photo
I am a wife, mother, teacher, runner, baker, fund-raiser, reader, watcher of movies, dog-lover, writer, music-lover and foodie. So - I'm a woman of many moods! I write and share in order to teach and enrich. I currently have two blogs going: The Kitchen Refugee, and A Mile At A Time. The first is about time spent in the kitchen and the second about time spent on the road. Frequently the two roads intersect!

Monday, November 8, 2010

It's Soup Season!

As rain is falling on the leaves in the yard - the ones that blew down just after I had finished raking up seven bags - I feel the urge to fill the house with the smell of our fall and winter favorite: soup and bread.  The combinations vary, but tonight, it's clam chowder and artisan bread.

Chowder is one of my husband's favorites, and he's even been known to pop open a can of Snows from time to time.
Personally, I can't face that gluey mess!

The Chowder Recipe is from a local restaurant, Ten Depot Street. http://www.tendepotstreet.com/
Owner, Sandy Sorrels, frequently shares recipes in her weekly advertising column in The Observer.  Clam chowder is a fan favorite. I really like this recipe, and having the option to have it at the restaurant or to make it at home.

This makes a lot, so make sure you have a VERY LARGE pot to cook it in.
It seems like this is a lot of work, but it's mostly in the prep.  If I know I'm going to make chowder during the week, I'll throw in extra bakers some night for dinner, and cook extra bacon at breakfast - those two seem to take the longest to get ready!


10 Depot's Clam Chowder
• 2 8 oz. cans/jars of clam juice
• 4 cans chopped clams
• 3/4 gallon milk (2% at the very least)
• 2 stalks diced celery
• 1 onion, diced
• 1/2 large carrot, grated
• 1/2 bunch parsley, diced
• 4 medium baked potatoes, chopped to bite sized pcs. (don't over-bake - they'll get more cook time in the soup pot!)
• 1 lb bacon, cooked, chopped
• 1/2 TB pepper
• 1 1/2 tsps. EACH - onion powder, garlic powder
• 1 tsp. thyme
• 1/4 tsp Tobasco
• 1/2 tsp Worcestershire
• 1/2 cup white wine
• 1 3/4 cups roux (flour/water paste)

In a large pot, combine milk, clams, clam juice, spices/sauces, and bring to a boil.
As soon as the soup boils, whisk in the roux until the soup is tight and the roux is dissolved.
Turn the heat down to low.

While waiting for your liquids to come up to a bowl, prep your veggies. Saute carrot, parsley, onion and celery until tender.  Add the 1/2 cup of wine to deglaze the pan.

For Roux - In a separate bowl, I just start whisking flour and water together until I have a really thick mixture.  Measure out 1 3/4 cup and dump the rest.  I can never get it done exactly - I always have to add flour or water until it's the right consistency, then I've got too much!

Add the veggies, bacon and potatoes.  Heat this all together and let it simmer 15 minutes or so to bring all the flavors together.
Absolutely full to the brim - I need a bigger pot!


Serve with salad and the bread of your choice and you've got a party!  OR you've got a quiet Sunday night in front of the fire.  :-)

The Other Sandwich Bread

 Not long ago I thought I'd like to have a bread machine.  I bought one, and was mesmerized by all the kneading cycles and the magic of how it just seemed to know how long to cook the loaf.  However, I was quickly disenchanted and missing my favorite parts of making bread: kneading by hand, waiting between rises, and using my other senses to let me know when all things were working in perfect harmony.  I'm a bread geek - I like to touch dough and be the one responsible for its outcome.  


I made this realization after I had ordered some bread machine cookbooks and found several recipes on line that looked good.  Since then, I've been making adjustments to these recipes and making bread with my own two little kneading machines!


Although my husband's weekly sandwich bread has been "Love Bread" (previous post) I changed things up a bit and now we have another new favorite -


Bruce's Honey Sesame Bread 
(I don't know who Bruce is, but this recipe came from allrecipes.com)


I've adjusted to make it by hand, but if you have a machine, I'll include those directions at the end.


• 1 1/4 cups warm water 
• 2 2/4 tsps. yeast


Dissolve the yeast in the water.


Add -
• 1 TB powdered milk 
• 1/4 cup honey
• 3 cups bread flour
• 3 TB wheat germ, or wheat bran 
• 1 1/2 tsps. salt
• 1/2 cup sesame seeds (toasted, or not - depends on lazy you feel!)


To toast the sesame seeds - just put them in a dry, non-stick frying pan and stir them frequently until they are lightly browned.  I have skipped this step as I can't taste too much difference in the bread. Baking brings out just as much sesame flavor.


It just takes a few minutes!
Not too dark, just a light toast!


Stir all ingredients together, working in the last of the flour, and a little more if needed to make a soft, but not sticky, dough.  Let rise in a warm place until almost doubled.


Punch down dough and shape into a loaf.  Let rise until it raises well above the edge of the bread pan.


Bake at 350º for approximately 20-25 minutes, OR half as long if you have a convection speed bake option.  I like to speed bake breads as I feel the airflow of the convection fans gives more even cooking.  Bread is done when it's well browned and it sounds like a ripe watermelon when you thump it.


(For Bread Machine: place ingredients in bread machine, and select Basic Bread Cycle.)


We love this bread as toast, or sandwich bread.  I think it's a tad sweet for sandwiches, but Brian likes it this way.  For my own preference, I think I'd cut the honey in half. 


Enjoy!!


Sunday, October 31, 2010

Happy Birthday Cake!

A few summers ago, a young friend I was working with kept saying she was in the mood for a really rich chocolate cake.  Since she's a friend of my daughter's, and I feel that kind of mamma-love for her, I started researching cake recipes.  My mother has always subscribed to the view that cakes made from scratch are some sort of mystery - so I was raised on box mixes.  I realize they serve a purpose, but cake has become less and less mysterious to me the more I experiment.

This week I had a lot of spare time on my hands, and two friends with birthdays.  Instead of spending money I don't have on gifts, I gave the gift of home-baked goodness!  I love this recipe because it combines all things decadent: butter, buttermilk, strong coffee, heavy cream, and loads of chocolate ganache!  It is three layers of over-the-top chocolate coma goodness!  I believe this came from www.cooks.com.

Fudgy Chocolate Layer Cake     
Preheat oven to 325º
Cake: Bowl 1:
1 1/2 cups sugar
1 1/4 cups all-purpose flour
3/4 cups unsweetened cocoa powder
2 1/2 tsps. baking powder
1 1/2 tsps. baking soda
1/4 tsp. salt


Bowl 2:
1 cup buttermilk
3 eggs
2 1/2 tsp. pure vanilla extract


Bowl 3:
6 TB unsalted butter
1 cup strong, hot coffee


1, 2, 3, MIX!
(P.S. - RIP favorite big mixing bowl lost in the line of duty!)  
(I generally prepare bowl 3 first, so the coffee has a chance to melt or at least soften the butter.) 


•Cut butter into small pieces and pour hot coffee over it.
•Mix all the dry ingredients in a large bowl.  
•Whisk together the eggs, buttermilk and vanilla.


•With a whisk or hand mixer, add part of the coffee mixture and part of the buttermilk mixture to the dry ingredients, and blend slowly.  Stop the mixer and scrape the sides of the bowl, add the remainder from bowls 1 & 2, and blend until all ingredients are well incorporated.


•Pour into 3 8" cake pans - prepared with cooking spray or shortening, with parchment or waxed paper in the bottom of each pan.  See?  This is pretty simple!


Ready for the oven!


Bake cakes for 25-30 minutes, rotating them in your oven halfway through the process.  Cakes are done when they can pass the 
clean-toothpick-in-the-middle test!


Remove cakes from oven and cool on racks for at least 10 minutes before removing them from the pan and cooling completely.  Once cooled, remove the wax/parchment paper.


While the cakes are cooling, it's time to whip up some serious chocolate ganache.  This is so easy, and makes it look so spectacular - this is way beyond frosting!


1 1/4 lbs. bittersweet chocolate (I just used chips)
1 cup heavy cream
2 TB light corn syrup
5 TB unsalted butter, softened


Put the chocolate and butter in a large bowl.  In a small saucepan, bring the cream and corn syrup to a boil.  Immediately pour over the chocolate and let stand in a warm place for about 5 minutes.  Gently whisk the ganache until smooth.  Refrigerate to bring down the temperature, but *STIRE FREQUENTLY so it doesn't set up completely.  You want it thick enough to spread, but not returning to a solid!


Spread ganache on each layer, then around top and outside of cake.  Sing Happy Birthday, or Happy Monday, or Happy-Happy-Joy-Joy, and get a fork!

I decorated with white chocolate shavings.

Friday, October 8, 2010

The Tamale Experiment

         I have always loved tamales, and frequently order them in Mexican restaurants.  Now that we're really trying to stretch one paycheck as far as possible, I decided I'd try to make tamales again.  They're great for using inexpensive cuts of meat, so when Safeway had pork loins on sale I bought one and reserved a large chunk for tamale filler.  The rest of the ingredients border between inexpensive and down right cheap!

Years ago I asked the mother of one of my childhood friends if she would show me how to make tamales.  In many Mexican households they are the fiesta meal for either Christmas Eve or New Year's Eve.  Emparo welcomed me into her home and tried to school me on the intricacies of tamales.  I was much younger then, and had less patience, so the whole process, while fascinating, left me thinking I could live the rest of my life on Hormel tamales that dump out of a can.  Oh my, how I've changed!  Now I appreciate the work involved in special meals and feel it's totally worth the effort.


This time around I started where I generally do - searching the internet for recipes and video clips.  I got a couple of good ideas, and of course changed almost everything about the originals.  I planned on this being a two day process - one day to slow cook the filling, and another day to wrap the tamales.

Pork Tamale Filling - Teacher Karen style (approx. 2 dozen)

1 1/2 - 2 lbs pork (chicken, beef, elk etc.)
1 large onion, diced
1 green pepper, diced
2 dried ancho chile peppers, stemmed, seeded and diced
3 cloves garlic
1 1/2 tsps. salt
1 cup water

Season to taste: I put in a couple tsps. cumin, 1 tsp. chili powder, - and added more heat/salt after everything was cooked.  Spice is one of those things you have to determine for your own family's taste buds!

Slow cook the meat, veggies and spices until cooked through, and tender enough to shred with a fork.  You can use a crock pot or dutch oven - whatever your preferred method.

Once this was cooked, I drained off excess fluid/juice and added a prepared enchilada sauce for some extra kick and flavor.


Soak corn husks in hot water for 20 minutes to a half hour.  You don't want any part of the husk to be crunchy, or it will tear when you try to spread on the masa.


This dough is too hard!

Tamale Dough:
2 cups masa
1 can (10.5 oz) beef broth (you could sub. chicken, or veg. broth depending on your filling)
1 tsp. baking powder
1/2 tsp. salt
2/3 cup vegetable shortening
(I ended up adding at least another cup of water to this mixture to get the consistency right)
1 pkg. dried corn husks.


This dough is just right! See how spreadable it is?
Spread masa on the big end of the husk.
It works best if the husk is in your palm.
I prepped several husks at a time before
filling and folding them.


Okay - here's the tricky part: getting the masa dough the correct consistency to spread onto the husks.  This is where the patience of my younger self was tested to the breaking point.  I remember just getting so frustrated.  This particular recipe called for some shortening, which I think helps in this department.
You don't want your dough the consistency of cookie dough, but smoother, like mashed potatoes.  I guess the best rule of thumb is, if you're fighting it or breaking your husks, add more water to the dough. I used the back of a spoon to spread the masa across the husk.  Be forgiving.  What looks like a ridiculous mess all comes together once they are steamed and holding their own shape!

Place filling in the center
Fold over one side.
Fold over the other side.

Fold over the small end of the husk, leaving the big end open.
This method is called (by one YouTube video artist)
The Baby Tuck!


or in a container for freezing.


Place the tamales in a steamer...


Many of the recipes I looked at on line call for you to wrap extra husks around the prepared tamale.  This protects them from water during the steaming process.

Place tamales in a vegetable steaming basket, open side up.  You can place a wet towel in the center and set the tamales around it, forming a cone shape.  Place a 1-2 cups of water in the bottom of your cook pot - not enough to come up into the steamer basket and moisten the tamales.  Most recipes call for steaming anywhere from 40 minutes to an hour.  To test for doneness, remove one tamale from the pot, and gently unwrap the husk.  If the masa is still clinging to the husk, it's not ready yet.  Don't rush this process or you'll end up with wet, mealy tamales.

Once you think your tamales are cooked, allow them to cool a bit before unwrapping the husks.  This makes it much more likely to remove them in one piece!

If you want your tamales served up restaurant style, you can cover them with some enchilada sauce, a sprinkling of cheese, and do a quick heat under the broiler.

*If you are a vegetarian, create your own filling, and when preparing the masa, just use spices and water, or add vegetable broth.  I've had some delicious veggie tamales stuffed with peppers, onions, chiles, and cheese!


Sunday, September 19, 2010

Gramma T.'s Barley Salad

In my last post I wrote about the end of the gardening season, and all that fresh lovely produce that will soon be replaced by store-bought, lightly colored, barely flavored, roughage.  Booo!

One of our favorite summer delights is a barley salad my mother in law makes.  When I asked for the recipe, like most good dishes, I found out there isn't one.  Now, when I was a young bride and new cook, this used to frustrate me no end.  Now I understand that many things are made 'to taste' and all you need is the general idea.  Barley Salad is no exception.  I asked if we could make it together, and showed up at her house with notepad in hand.

Gerry had already pre-cooked and cooled some barely, so the rest of the ingredients needed to be snipped or picked from the garden, washed and diced.  Nothing like an hours-old salad!  (This one does need to sit in the fridge for a couple of hours in order for all the flavors to gel.)

Here's the idea:

'Scant' 1/2 cup of pearl barley, cooked and cooled (barley quadruples in size)
Parsley  (possibly 2-3 TB)
Basil leaves (possibly 1 TB - uncooked, it has a strong flavor )
Dill (a little goes a long way - but I love it!)
1 Stalk of celery
Green pepper (1/2 of one?!)
2 med-lrg. tomatoes - skinned & seeded
Cucumber, seeded (how much depends on the size of them - we used about 3 little pickling cucs)
Miracle Whip - 1/4 - 1/2 cup - add as you go so the salad doesn't get too wet
1-2 TB Ranch dressing powdered mix
(This amount served 4 adults with about a cup of extra salad left over.)

On the off chance that I have an novice chef amongst my readers, I'll explain about skinning a tomato;
Drop it into boiling water for about 30 seconds, remove from hot water and drop into a bowl of cold water.  The skin should slip right off.  I saw a chef on Food Network slice a little X on one end of the tomatoes to give her an 'in' to the skin.  It looked pretty easy.  You don't want to cook the tomato, just loosen its skin a bit.


I had never heard the term 'California Salad' before and I don't know from what era it comes.  Gerry says it had to do with fresh ingredients from the garden - whatever you have, added to a grain.  No recipes were passed around, it just became the term for seasonal salads.  The thing I think we really love about this salad - besides the absolute freshness of it, is that each ingredient is minced.  There is nothing in the salad bigger than the barley.  This extra touch makes it  so delicate, it's just really lovely!


I don't know about you, but I haven't had Miracle Whip in my house since...EVER.  My mom used to use it and I think I had my fill as a child.  I'm not much on mayo, but Miracle Whip is something I associate with bologna-white-bread sandwiches.  ICK!  In this case, though, I wouldn't consider a substitution.  Trust me this salad works!

Okay - so barley, chopped veggies/herbs, and then slowly add a plop of Miracle Whip.  This isn't a salad that's swimming in sauce - let the fresh flavors carry it, and the 'sauce' just smooth it together a little.  Even though we've seeded the cucs and tomatoes, they still add quite a bit to the moisture content.  Sprinkle in 1-2 TB of dry Ranch Dressing mix, and just give it a taste.  All of the ingredients depend upon what you love, and what you have growing in your yard.

Friday night we had dinner with both our moms - I made a meatloaf with organic beef from a friend's ranch.  This was also the day of the Chocolate Cream Pie!  Gerry and I made the barley salad together, and the corn on the cob was dropped into the pot of boiling water minutes after it was picked. My mom got to show up empty handed!  This was truly one of those end of summer meals that was just meant to be savored! It  was all good, and it was nice to share it with family.

Saturday, September 18, 2010

Beautiful Bruschetta

Our boy, Earl, posing in a pile of leaves last fall.
As long as he's in the back of a pick-up, he's happy!
The daylight is getting shorter, and the nights are getting cooler.  I have that melancholy season-change feeling when Summer is ending and Fall begins.  I do love Fall, but it just seems to have arrived so soon!  Eastern Oregon generally has some of its most spectacular weather in October so I'm hoping for a nice, long, Indian Summer.

I was going to harvest then dig up the basil for the last time today, but my husband suggested we hold out until the first frost.  I have more pesto in my freezer than I know what to do with and I'm getting tired of the process.  We have been enjoying fresh basil in a lot of dishes, and on our pizza, so I decided to leave the pots alone for now and we'll see how much longer we can grow herbs.

My mother in law has a counter full of ripe tomatoes, and my little cherry tomatoes came on all at once.  Since it's cool enough to bake bread, I figured I'd bake up a crusty loaf and make some Bruschetta.
Now, I thought Bruschetta was always topped with a tomato-basil mixture, but I did a quick look on Wikipedia (I know, not the most worthy of informants) and found this definition:

Bruschetta (Italian pronunciation: [brusˈketta]  is a hearty appetizer from central Italy whose origin dates to at least the 15th century. It consists of grilled bread rubbed with garlic and topped with extra-virgin olive oil, salt and pepper. Variations may include toppings of spicy red pepper, tomato, vegetables, beans, cured meat, and/or cheese; the most popular recipe outside of Italy involves basil, fresh tomato, garlic and onion or mozzarella. Bruschetta is usually served as a snack or appetizer.


(JJ if you want to weigh in on this, please do!)


I don't really have a recipe for this, but there are plenty on the internet.  It's just one of those things that if you know what you like, you'll figure out how much of each ingredient to use.
I start with a mixture of tomatoes - cut in small pieces and seeded.  I like to use a variety if I have them - I  add in cherry tomatoes or the yellow pear tomatoes for a festive look.  Then I chop fresh basil leaves, add a small drizzle of olive oil, some salt and course ground pepper.

Crusty artisan bread hot from the oven!
Next I prepare the bread.  I cut it in thin slices and either brush it with olive oil, or if I'm feeling really decadent, I spread it (lightly) with butter.  I brown the bread on both sides in a frying pan.  When the bread is still hot from the pan, I cut a garlic clove in half, and rub the cut side against the hot bread.  This is where true magic happens.  I've seen this done on cooking shows, and never really understood the value of this small gesture until I tried it.  No chunks of garlic to eat, just the nice essence of garlic on the bread.  Mmmm...


Top the garlic/toasted bread with the tomato mixture and just smile to yourself.  It's such a nice way to take advantage of the end of summer abundance.  I always savor it - I know how much snow and freezing temps I'll have to endure before I see and taste another blood-red tomato again.

This is clearly an internet photo - I can never leave my
bruschetta alone long enough to take its picture!


Friday, September 17, 2010

I'm not Julie OR Julia!

I am so in love with the movie, Julie and Julia, I could honestly marry it.  I don't know what it is exactly, but perhaps it's just the simple notion that food can soothe the weary soul.  We all have our go-to comfort foods, and even certain foods for certain emotional occasions.

I can so identify with writer, Julie Powell (played by Amy Adams) and how she takes solace in Chocolate Cream Pie.  To borrow a quote from the movie:
"You know what I love about cooking? (What's that?) I love that after a day when nothing is sure, and when I say nothing, I mean nothing, you can come home and absolutely know that if you add egg yolks to chocolate and sugar and milk, it will get thick.  It's such a comfort!"

Oh, yes, Julie, it is indeed a comfort!
In my current life of un-sureness, the sheer magic of combining ingredients for the greater good just sets my motor to a gentle hum. It is a comfort.

I currently have Fridays off as I'm working 4/10's with the City of La Grande as a temporary grunt laborer.  I spend my work days running a weed whacker, painting fire hydrants or even spreading soil with precision in prep for lawns of perfection.  I do so with a heavy heart, missing the class I was supposed to be teaching this year, worrying about how they're managing all mashed together in one big class all in the name of saving money.  Budgets: Ba-Humbug!  By the end of each day I look like the Charles Schultz character, Pigpen, and the brooding lines are heavy on my dirt-caked forehead.  But Fridays are mine.  Brian is at work, and although I look forward to our weekends together,  Fridays are the days I can really commune with the kitchen.

Today was a day that surely called for Chocolate Cream Pie!  I put myself back on the substitute teaching list, and tried to make peace with how this year is going to go.

I did an internet search for "Julie and Julia Chocolate Cream Pie" and found many recipes that claimed to be 'it.'  Finally, genious that I am, I had the bright idea to become more specific, and looked up Julia Child's Chocolate Cream Pie, and voilà!  I found a recipe adapted from Gourmet Magazine, April, 1994.  I think this is the one.

Just to warn you, this is no ordinary puddin'-pie!  It's a giant custard of delicious, creamy, comfort.
Now, I don't know who they're kidding with the pie-plate measurement.  The recipe calls for a 10" pie plate.  As I was mixing the crust I knew it would never fit, so I transferred it from my brimming pie plate into a spring-form cheesecake pan.  Crisis averted.  No crises allowed in this chocolate-therapy session!

Chocolate Cream Pie
Crust:
2 cups graham cracker crumbs
6 TB butter
1/3 cup sugar (I left this out)

I have more success pressing a crust into a spring form pan by using the bottom of a measuring cup. It's nice and flat, and the roundness of the side allows you to press the crust against the side of the pan.

Bake the crust at 350º for 15-20 minutes.  Cool on a rack.

Filling:
5 oz. bittersweet chocolate (as high a quality as you wish - I just used chocolate chips!)
4 oz. unsweetened chocolate, chopped
1 cup sugar
1/2 cup cornstarch
3/4 tsp. salt
6 large egg yolks
4 1/2 cups milk (2% or whole - don't skimp - save skinny pudding for another day!)
3 TB unsalted butter, cut into cubes, and softened
1 1/2 tsps. vanilla extract

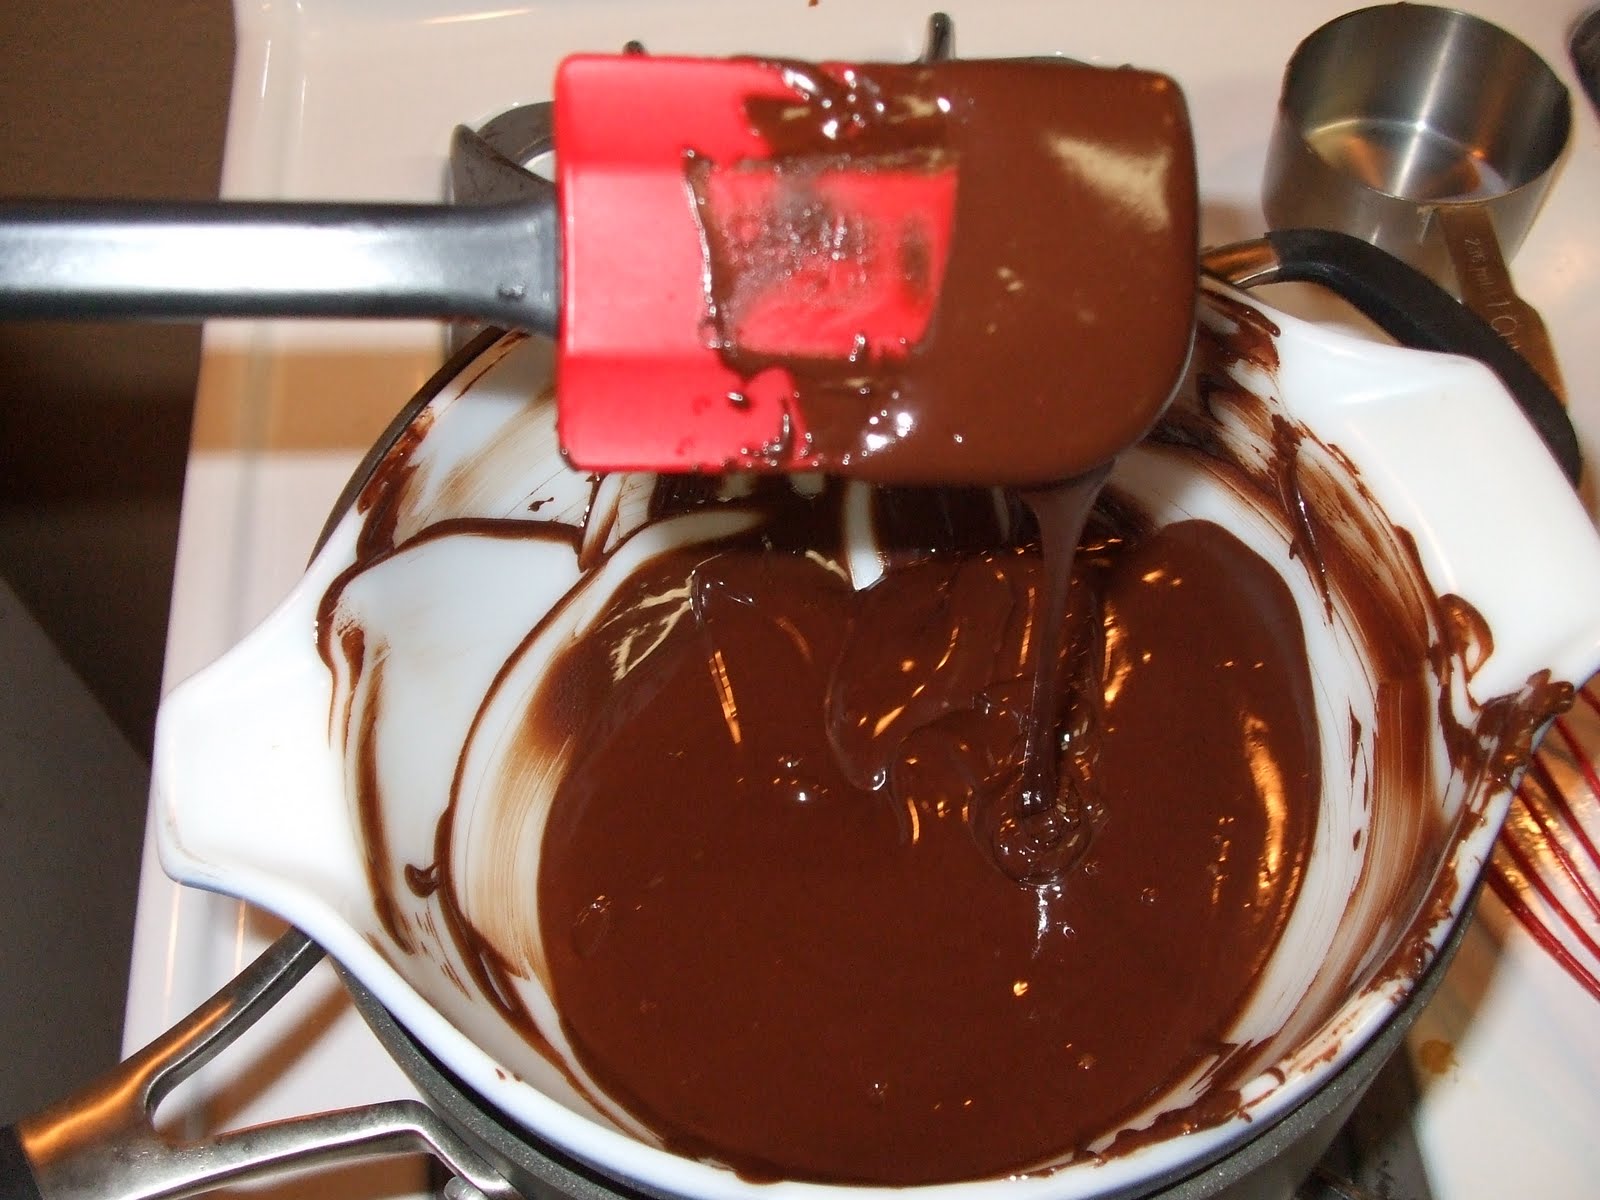
In a double boiler set over simmering water, melt the chocolates and stir until smooth.  Remove the bowl from the heat.
Chocolate before...


...during...

and after.


In a heavy saucepan (that can hold 3 quarts) whisk together the sugar, cornstarch, salt and egg yolks until just combined.  *I had a hard time with this, and had to add 1 cup of milk to get it to 'whisk' rather than form a hard ball.*  Add the rest of the milk, while whisking.  Bring to a boil and boil for 1 minute.
Remove from heat and whisk in the chocolate mixture, butter, and vanilla.  Pour into prepared crust and cool completely.   Cover the surface with wax paper or plastic wrap to avoid the formation of 'pudding skin.'
Custard mixture 
mmm...nice and thick!
                                                 
                                                             A match made in heaven!


I now pronounce you Pie and Crust.  
You may now lick the bowl!

Top with whipped cream and let the day melt away!

Chill for at least 6 hours before serving.  For being a pudding filling, this is really almost fluffy.  A most delightful, if not spectacular dessert!

In the spirit of  my 'Cook, Eat, Share' motto - we had both our moms over for dinner, and had enough Chocolate Cream Pie to send them each home with some.  Then I took a nice big chunk to my friend, Celine (I waited until after she'd put the kids to bed).  Her husband has just been deployed to Iraq, so if anyone needs some comfort pie - she does!  We had a nice, chocolatey visit.

I was smiling to myself as I thought about Julia Child's signature catch phrase, Bon Appétit!  When my daughter was in Montessori preschool, before having snack the teachers would say, "Bon Appétit, it's time to eat!"  Alli's classic misinterpretation was, "Bone up your teeth - it's time to eat!" :-)


For more recipes or movie trivia, go to:
http://www.sonypictures.com/movies/julieandjulia/site/

Peanut Butter Granola Bars

I just love those chewy, nutty granola bars from the grocery store, but really don't want to pay so much for them, or their lovely, excess packaging.  I have been experimenting with granola bars, and think I've finally gotten the recipe just right.

As always, when monkeying with a new recipe, I start with a base recipe that seems to work well.  I want to make sure my ratio of wet to dry ingredients remains the same, and that substitutions I make won't ruin the whole thing.

My base recipe for granola bars comes from Food Network Chef, Alton Brown.

His Recipe reads as follows:
• 8 oz old-fashioned oats - approx. 2 cups
• 1 1/2 oz. raw sunflower seeds, approx. 1/2 cup
• 3 oz sliced almonds, approx. 1 cup
• 1 1/2 oz. wheat germ, approx. 1/2 cup
• 1 3/4 oz. brown sugar, approx. 1/4 cup packed
• 1 oz. butter (1 oz. = 2 TB)
• 2 tsp. vanilla extract
• 1/2 tsp. kosher salt
• 6 1/2 oz. chopped, dried fruit

Butter a 9x9 glass baking dish and prehat the oven to 350º.

Spread oats, nuts and wheat germ on a sheet pan and toast for 15 minutes, stirring occasionally.

In a sauce pan, combine honey, brown sugar, butter, extract and salt.  Cook until the brown sugar is completely dissolved.

Once the oat mixture is toasted, reduce the oven temp to 300º.  Add the oat mixture to the liquid mixture, add the dried fruit and stir to combine.  Press this mixture into a greased baking dish and press down, evenly distributing the mixture.  Bake for 25 minutes.  Remove from oven and allow to cool completely.  Cut in squares and store in an airtight container.

Now - here's what I did:  I started by doubling the recipe!

Mrs. T.'s Peanut Butter Granola Bars
• 4 cups rolled oats
• 1 cup peanuts
• 1/2 cup sunflower seeds
• 1 cup large flake coconut
• 1 cup wheat germ
Toast oat mixture @ 350º for 15 minutes, stirring frequently.


In saucepan, heat:
• 1 cup honey
• 1/2 cup brown sugar (packed)
• 4 TB butter (1/4 cup)
• 1/2 cup peanut butter
• 2 tsp. vanilla
• 1 tsp. salt

*Now, I realize I've added an extra 1/2 cup to the wet ingredients, but I've also added to the dry ingredients as well, so it worked out okay.  AND - I was going for CHEWY!

Mix the wet with the dry, and pour the whole mess into a 9x13 baking dish.  *I lined the dish with parchment paper, to avoid cleaning, and to make sure it all came out of the pan.  (I had a previous granola bar mishap that lead to my chiseling the mixture out of the pan!  Lesson learned.)  To press the mess into the pan in a uniform manner, I sprayed the bottom of a bread pan with Pam, and used it to push the granola mixture evenly into the pan.

Bake at 300º for about 25 minutes.


If you want crunchy granola bars, spread the mixture into a large cookie sheet, so they are thinner and easier to bake to your preferred crunchiness.  If you want them chewy, make them thicker by using a smaller pan.  This is not rocket science!  :-)


I cut my granola bars into rectangles instead of squares so they are more like the serving size you would get in a store-bought bar.  I'm really happy with how these turned out!  I think they are a little sweet for my liking, and the next time I try it, I may eliminate the brown sugar and just rely on the sweetness of the honey.

When I'm at a loss for equivalents I generally turn to the back of my dog-eared copy of A Taste of Oregon, by The Junior League of Eugene, OR. If you don't have a good reference manual at your fingertips, try
http://www.foodreference.com/html/tweightmeasure.html.  I've found it useful.

Now pour a cup of coffee and enjoy your granola bar!

Sunday, September 12, 2010

Simply Scones

 I picked up this little cookbook on a sale table at a book store - as I do many of my favorite finds.  The pages are falling out, and have butter splotches on those tried and true recipes that I use over and over again.  Currently available at www.amazon.com, this is my go-to scone book.

After picking another bounty of Mt. Emily huckleberries, I knew I had to add them to some butter, flour, and sugar and make some breakfast magic.

On page 26 of Simply Scones, by Leslie Weiner and Barbara Albright, is a very basic recipe that I use all the time.  While the book is full of specialty scone recipes, the plain old Buttermilk Scone recipe is one that I find to be the easiest - I almost always have the ingredients on hand, and can easily make substitutions when needed.

Buttermilk Scones - Preheat oven to 400º
2 cups all purpose flour
1/3 cup granulated sugar
1 1/2 tsp. baking powder
1/2 tsp. baking soda
1/4 tsp. salt
6 TB *Unsalted Butter (I ALWAYS use salted, and then don't add the 1/4 tsp. salt - I'm not a butter purist!)
1/2 cup buttermilk (Don't have it? Substitute 1 TB vinegar to 1 Cup milk - in this case 1/2 TB/1/2 Cup.)
1 large egg
1 1/2 tsp. vanilla extract


When adding blueberries or huckleberries, I almost always add some lemon zest - it just gives it that little extra something!

In a large bowl, stir together all of the dry ingredients.  Cut the (cold!) butter into small pieces and add to the flour mixer.  Using a pastry blender, crush the butter into the flour until it resembles course crumbs.
*This is when I add fresh or frozen fruit, and lightly coat it with the flour mixture.  Try not to over-stir, or you'll end up with scones the solid color of your fruit.

 In a separate bowl, mix together the liquid ingredients: buttermilk, egg, vanilla.  Stir into dry mix, just enough so that no powdery-dry ingredients are left in the bowl.  Again - over-stirring breaks the fruit, and warms up the butter.

*At this point, the recipe book calls for the cook to shape a disk out of the dough, with lightly floured hands, score it on top (like cutting pie slices, but not all the way through) and bake.

I prefer a more rugged looking scone, so I spoon-drop them (big spoon) onto an ungreased baking sheet. Then I sprinkle the scones with sugar - if you can find the course, decorative sugar in your area - it makes it prettier.  I live in 'Podunk', Oregon, and have yet to find it in a store!  :-(


Bake for 18-20 minutes or until the top is lightly browned and they can pass the toothpick test.  Cool scones on a wire rack for as long as you can stand - then pour the coffee and enjoy!  This is one of those recipes that makes me feel like I never need to visit a bakery again!


Love Bread


Okay – this recipe isn’t really called Love Bread, that’s just what my husband calls it!  He claims he can taste the love in his sandwiches!  It’s worth making it each week just for a compliment like that.


It’s actually called Setpoint Bread, from the 1980’s book, The Setpoint Diet, by Dr. Gilbert Leveille.  I got the recipe from a friend of mine, but have never actually read this book.  It’s also quite possible that the recipe has been tweaked from its original.  But – it’s good, and as far as bread goes, I think it’s fairly easy.


Setpoint Bread  (Preheat oven to  375º)

1 TB yeast
2 C warm water
2 TB vital wheat gluten
3 TB honey, molasses, or sugar
3 TB oil
2 tsp. salt
5-6 cups of flour – 3 are whole wheat, the others, white

Proof the yeast in one cup of warm water.
Add the other cup of water, along with gluten, oil, honey and three cups of wh/w flour.  I sprinkle the salt in at this point.  Although bread machine recipes have you dump everything in at once, on the advice of pastry chefs, you really shouldn’t put your salt in direct contact with your yeast.

Add the rest of the flour a little at a time until you must knead the rest in by hand.  You want a firm dough, that isn’t sticking to you or your counter.  I never count minutes of kneading – I just knead the dough until it’s smooth and elastic.

Place dough in a greased bowl and cover with plastic wrap, or a warm, damp towel.  Let the dough raise until doubled – 2-3 hours. 


Shape dough into two loaves, and place in greased bread pans to raise again – until the dough rounds above the pan. 


Bake for 25-30 minutes – until well browned, and if you’re not sure – thump it like a watermelon - if it sounds hollow, it’s ready.  Allow the bread to cool on racks for 3-5 minutes before you remove the loaves from the pans to cool the rest of the way.  (Leaving them in the pans to cool will build condensation inside the pans and make for a wet crust.)


*If you wish – you can make additions to the dough –
sunflower seeds
raisins/cinnamon
Extra bran can be added to the mix – I just count is as part of my flour measurement – maybe adding a ½ -1 cup to the recipe.  

Cook, Eat and Share the Love!